Monday, October 21, 2013

New obsession...the Chinese Clay Pot

I have a new obsession, the Chinese Clay pot.  I also have what might be a obstruction to my success in Clay pot cooking, that being my ceramic cook top. 

I have researched and read pros and cons and the people who said "it's no problem, use it" and those who wrote dire warnings about a culinary Apocalypse if I attempt it.

I HAVE to make the clay pot rice, rice, a little ground beef and some spices?  Oh yeah, I need that in my house.  I need it in my house TODAY.

I don't have much but I do have $12 and I am going to buy a clay pot today and will be venturing into spotlit glory or impending doom later this afternoon. 

I LOVE this!

I've morphed a quick recipe from what I read that came with the pot and some net searches and this is 

Tracy's Clay Pot Beef and Rice (Chinese inspired)

1/2 lb ground meat (I'll use pork next time)
1 1/2 cup short grain rice (I'll use slightly less next time)
water
1 Tblspn oil
green onions
soy sauce
sugar
garlic
ginger
(or garlic ginger paste)
salt
pepper
rice wine
oyster sauce
whatever other flavorings you love

SOAK the clay pot, completely submerged in water for a while (I soaked mine about an hour)  I truly didn't want it to explode on my cooktop.  Oh and "spoiler alert"  it didn't.

IN a blue bowl, mix the ground meat and whatever spices you like, add a little water and squish it around and leave it.  (mmm, the raw meat shot)


In the soaked pot, put about a Tblspn of oil and some salt, then add the rice and enough water to cover the rice by about half an inch.  That, in my house, is my thumb nail ;)
   
Put the lid on the clay pot and leave it about 15 minutes.  Turn the heat on and bring the pot to a boil (time to peek)
   
Ok, it's doing SOMEthing, this is looking good.  After it boils about 4 minutes, reduce the heat and leave it another 4 minutes.
   
At the end of the 8 minutes boil/simmer time, spread the meat on top of the rice.  It's super easy, just sort of grab blobs (culinary meat term) and put it on the rice.  It spreads really easily. Pop the lid on for about 15 minutes, till the meat is cooked.
   
WOW!
This is delicious and tastes and smells like every Chinese restaurant I've ever been in.  The rice is a little chewy and tender at the same time.  The meat is soft and flavorful. I will play around with the spices and flavors as I continue on my Clay Pot quest.
   
It made a TON of food for 1/2 lb of ground beef.  Mum, Connor and I all ate from the pot and there was a little left for Connor's lunch.  

I think this is definitely worth my $12 investment from World Market.  I love this thing.  I'm going to try chicken and pork and maybe shrimp in here.  I think a little fry up of the meat first would also add a neat flavor element.  Yeah, I will be playing in my kitchen with this new toy.

There was some crispy (stuck) rice on the bottom, I like to eat that part (mmmm crispy) For those who are not a fan of the crispy bit, it came up fine with a soak.  I think this pot will work just fine so long as it's not subjected to extreme temperature changes.  I say NAY to the nay-sayers, you most certainly CAN use a clay pot on a glass cooktop successfully.  

OH and as a weird aside, 2 hours later, the rice was still WARM as it sat on my countertop.  Not hot but definitely warm and eatable.  This also might be a decent thing to do for my "I won't be home till 11pm" husband who insists on microwaving the food I cook.  Hmmmm, I think he needs his OWN clay pot. 


Now, I hear you can do noodles in it too...

Go get one of these, it's fun, different and makes a meal a little bit different than the usual stir fry.  I still can't believe that little bit of meat flavored all that rice so beautifully... yeah, we are happy on this one.

/enjoy

Tuesday, October 1, 2013

Linen things I make and sell that are totally food related.

I try really hard not to steer you wrong.  I love sharing my ideas and recipes and just general stuff here.

I like to have some of the toys that go along with the cooking that I do. I'm not a fan of single use or specific use items, I think we all need to be using our money on things that have many uses.

I sell on Etsy and my store is:
Tracy Makes Stuff

I sell through my Facebook store page:
Tracy Makes Stuff in Austin

That being said, I have a few items that I use in my house that I make to sell and I think they are appropriate items to list here.

A head's up, the linen bread bags are going to be included in a Californian magazine in their December issue, I'll post the link here closer to the time.  I'm so excited :D

Anyway, these are the foodie items I'm selling in the store.  I wanted you to have 'dibs' on them because Christmas is coming and I am planning of starting to make a lot more of these items.

1.  Linen baking cloth, also known as a clouche.  
Bakers Linen Cloth Baking Clouche 100% Linen Flax Linen Proofing cloth
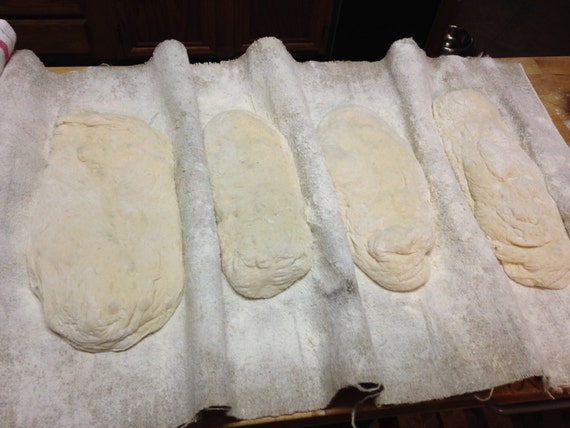
I use these to cover my island when I make bread  It reduces the amount of flour I need.  I can use it to flip soft dough (like my ciabatta) around and over and I can cover loaves while they rise.  It absorbs some liquid and there is a solid difference in the dough that I shape and let rise on the floured counter and the dough that I shape and let rise on the cloth 


2.  Linen bread bags and Linen potato bags
Linen Bread Bag by TracyCooksinAustin Listing for a set of TWO

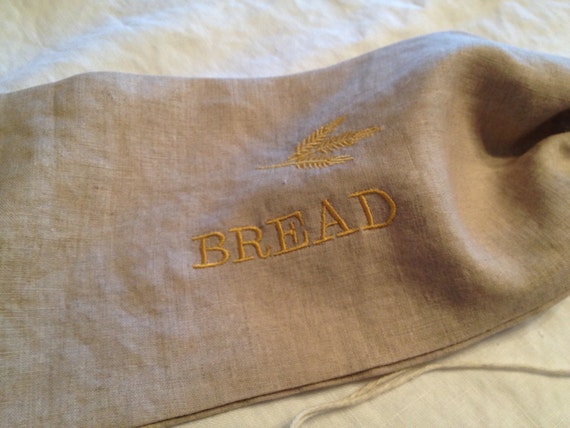
I use these to store my fresh bread.  There's no mold on the bread and it is better than plastic.  I don't think bread should be stored any longer than a day or two.  In my house, after a day or so, it becomes bread crumbs or croutons that I store in the freezer.

I also have these bags with the word POTATO across the front, yeah, I store my potatoes in them, they stop any mold or yukkiness from the plastic bag, and they're kept in the dark so they don't sprout so quickly.  Brilliant I know, my mother's idea.  OH and she has a pocked on her potato bag that says 'garlic'.  Yeah, high, dry, dark and it all lasts so much longer.


AND for the Whovians of us...
https://www.etsy.com/listing/164515906/dr-who-tardis-moustache-linen-napkins?


I'm OVER handing people a piece of paper towel when we eat. I don't like cotton napkins, they don't feel right and I'm all about linen.  I, however, do NOT make the linen napkins from 100% linen, because you'd have to iron then and there's no one with enough time or energy to iron napkins for every day.

I use a 80-20 linen cotton blend. No ironing and it behaves exactly like 100% linen.  The feel is the same, the look and the use.  Perfect. 

These are the perfect addition to the house.  They wash up a dream and I have a pile of them that are in perpetual rotation.  I have both the black and the natural, depending on my mood.  Initially, I thought black was weird as a napkin but it's GREAT! 

Let me know what you think of the items, I'm interested.  I don't know what the rates are to ship outside the USA but I'm looking into it. 

Have a great rest of your day, I'm making bread and pressure cooker jambalaya (which I'll post in a day or so) in preparation for my mom coming to stay for a bit.  I love playing in the kitchen with her, I'll post what we make. 

enjoy

Tracy

Sunday, September 22, 2013

Peanut Butter Cookies, easy, old fashioned and delicious. A classic recipe that I've been making since I was little and that's a really really long time ago.


Nothing dramatic, cutting edge or terribly fascinating here today.  Today it's about classic, easy and delicious.  When I was a little kid, really little by the handwriting on my stained recipe, my Auntie Mary used to make peanut butter cookies. They were delicious.  I remember carefully writing the recipe out on lined paper and putting it in the binder cookbook I had (and still have).  On the top is written, "Auntie Mary's Peanut Butter Cookies".  Did she invent it? Probably not but forever, they will be Auntie Mary's cookies.  The recipe is probably on the back of a peanut butter jar somewhere but it's the way I did it then and still do it.

Tracy's Auntie Mary's Peanut Butter Cookies

Preheat oven to 375

In a bowl, combine:

2 cups all purpose flour (you can substitute SelfRaising flour, just omit the powder and salt)
1 teaspoon baking powder
1/2 tsp salt

In a big bowl (or kitchenaid mixer)

Cream together:
1 cup shortening (or 1/2 shortening 1/2 margarine)
1 cup peanut butter (smooth)
1 cup white sugar
1 cup brown sugar

When it's smooth and gorgeous, add:

2 eggs
splash of vanilla
1 Tablespoon milk

When it's combined and creamy, add the flour mixture a little at a time until it's all combined.  No need to beat like crazy here, it's a cookie not an enemy.

DONE

NOW then, frequently I find myself adding a 12oz bag of chocolate chips, I like milk chocolate but semisweet works as does a combination.


Sometimes, when I'm particularly unhappy, stressed or missing whatever it is that I need to make my life happy, I will make these cookies in  a big bowl and a wooden spoon.

There's something cathartic about creaming sugar and fat with the back of a spoon instead of using the equipment.  If you have the chance, make these with a bowl and a spoon instead of the machine, they taste different, better.

Spoon onto cookie sheets and  press a fork that's coated in flour into each one to make a lovely crisscross pattern.

Bake about 9-11 minutes?  Cook them till you like them, longer for crispy and shorter for soft.

Cool these on a wooden board, it makes the bottom the perfect crispness.

Line them up like soldiers and eat with joy in your heart.  These are best eaten piled up high on a small plate so it looks like more, and with a large glass of icy cold milk for dunking.

Go make them, now

/tracy

Hot Fudge Upside Down Sundae Cake


QUICKIE dessert that everyone on earth should be making and eating, regularly.

Make this, eat this, feel joy and love in your heart.

I've been making this cake forever, I don't know where the recipe came from or how I found it, it's been my 'go to' for as many years as I can remember cooking on my own.  It's fast, it's SINFUL and it makes you and anyone near you happy and joyful.

TRACY'S HOT FUDGE UPSIDE DOWN SUNDAE CAKE

This recipe has THREE players.  Prepare each separately then combine in the right order and you will be in HEAVEN in 45 minutes.  READY?

Preheat the oven to 350 degrees.
Boil some water, either in a kettle or in the microwave, just get really hot water however you can.

IN a 8x8 or 9x9 square or round pan (see the choices you get!) combine:

1 cup all purpose flour (or self rising, just omit baking powder and salt)
2 tsp baking powder
pinch salt
2 Tablespoons cocoa powder
1/2 cup sugar

IN a glass measuring cup, combine:

1/2 cup milk
2 Tablespoons plain oil
2 tsp vanilla

IN a small bowl, combine

1 cup brown sugar
1/4 cup cocoa powder.
pinch salt

OK here's the instructions:

Pour the wet mixture onto the flour/sugar mixture and mix with a spatula.  I always use a spatula, I don't know why but it works.  Be sure it's all combined, it's the texture of toothpaste, seriously, it's supposed to be!

Smooth it out on the bottom of the dish and then sprinkle the brown sugar mix over it.
DO NOT MIX, just sprinkle it on the batter and look at how fabulous it's obviously going to be.

Pour recently boiled water or nuked water or really hot tap water over the whole mess to cover.  I use about 2 cups to get extra sauce but just be sure it's covered.

Pop it into the oven and bake for about 30-45 minutes.  The top of the cake will cook up through the water and will be dry looking and the volcanic chocolate fudge sauce will be erupting all around it.

Let it sit a moment then dive in!  I serve mine with custard because, well because I can.  It really doesn't need anything at all except a bowl, a spoon and a moment to take you to that happy hot chocolate fudge place for just a moment

MAKE this, enjoy


/tracy


Wednesday, September 18, 2013

Updates and plans...


Ok darlings; 

This isn't about meatballs, but there's a meatball post coming, I wanted to get your, "oh goodness!" juices flowing with this looker of a picture! 

My update is that: 

I'm writing to Nesco about my pressure cooker, trying to get involved with them to review and write more about it.  I have replaced the insert because I dropped it and it bent, but I have noticed my gasket is loose now and I have to decide whether to replace it or buy a new/same/different pressure cooker.  I have to admit that I love that thing and made some more food this week, the posts will be up this weekend.  I've been terribly busy with getting kiddo organized for his freshman year of homeschooling high school.  Exciting and terrifying. 

I've applied to be a tester with Campbell's.  I'll keep you posted on that. 

I'm working on recipes using some canned food, seriously, I accidentally tried some and well, they were delicious.  Watch for recipes. 

I am reworking some of my British classic recipes, bangers and mash, toad in the whole, pie with custard, cottage and shepherd's pie, Yorkshire pudding and suet dumplings.  Watch for those recipes and preparations as well. 

I've connected with my Norwegian sister and am going to try to get some ideas from her for some of her local fare, sometimes it's nice to shake it all up! 

In the mean time, start saving all your fat from whatever animal you happen to cook.  Save the fat and pour it into jam jars, labelled and shoved in the door of your freezer.  I have jars labelled, "chicken", "beef", "bacon" and "goose".  Yeah, I have goose fat.  Anyway, we will be using these fats in various incarnations over the next while and I want you to have it ready.  When you're at the grocery store, ask your butcher if they have any fat throw aways and if you can have it, some say yes and you can bring it home, render it in a saucepan over medium low heat for a long time and get absolutely DELICIOUS cooking fat for FREE. 

Ok, back to what I need to do, I'll keep you posted on the happenings.  

ALSO, my posts on Cuisinart, Nesco and Pappadeux are getting really high traffic, thanks!!!  

/Tracy


Monday, July 29, 2013

Baguette , the "I need baguettes but don't want to go to the store but I don't need them till tomorrow" type. Super easy, no kneading, just combine, stir, flip, roll, bake then eat. OH and they're absolutely delicious

I make a ridiculous amount of bread.  I make all sorts of bread.  I make a ton of different baguettes.  BUT I like THIS crazy easy version as my go-to for quick (you leave it to rise while you sleep!) version for the skinny baguettes that are perfect to take on a picnic, travel to a friend's house, to eat, to slice and toast as bruschetta or just to have to nibble.

This is quick and easy and here's the entire recipe before you can blink:

TRACY'S QUICK SKINNY BAGUETTE

Before you go to bed, in a large (3 qt or larger) vessel with a lid, combine:

3 cups all purpose flour
1 tsp yeast
1 tsp salt
1 tsp sugar
1 1/2 cups room temperature water.

Mix with a wooden spoon.  It's a gloppy mess.  Be sure the flour is all combined into the goo.  Snap the lid on the vessel, push it to the back of the counter and go to bed.

DING!  8 hours later.

Dump the dough, it's VERY wet, onto a floured board or cloth.  Fold it over itself a time or two, no kneading, just making it easier to deal with with a LIGHT coating of flour.  Divide into 4 and roll each gently into a very long log.  Transfer the logs to a sheet pan with a very light dusting of corn meal.  OR you can use a baguette pan :)  

Leave them, covered with a tea towel, to rise about 30-45 minutes while you preheat the oven to 425.  They will puff a little.

Put them into a hot oven and bake for about 30 minutes.  Spin at 15 minutes.  No steam or funny instructions, just bake them hot and quick.

Remove to a rack and try to leave it to cool then eat at your whim. Eat as much as you want, you can make more!

I didn't take any process pictures, these are the completed beauty shots

the outside
  
the inside
  

it's easy, flavorful, has great crumb and you'll feel like a bread pro.  

go mix a batch :) 

/enjoy

Sunday, July 28, 2013

Meat pie This is my free form meat pie for lunch, dinner, snack, party, gathering, function, take it, keep it, freeze it, reheat it, eat it. It's the one and only meat pie recipe you need.


I love meat pie.  I love most versions of meat pie.  This is one of my favorite versions because it's super easy and quick and takes one frying pan and one sheet pan and that's it.

You can use cooked or raw meat, leftovers, whatever veggies or combinations you love.  It's great hot or cold, it freezes and travels well. 

You can buy your pie crust if that is your preference or make your own easy version or my version or use puff pastry (VERY delicious).  

It's a completely customizable recipe.  It's more a method than a hard and fast recipe rule.  

This is how *I* do it, take it and run with it to make it your own instant family favorite and classic. 


TRACY'S FREE FORM MEAT PIE

1 1/2 lbs ground meat (your choice, I usually use beef and pork, you can use any meat, lamb is lovely also chicken either ground or in pieces)
1 onion chopped
1 carrot chopped
garlic (if you want)
salt and pepper
tomato paste
water or stock
flour for thickening
ANY leftover veggies you happen to have, potatoes, peas, corn, whatever you like

spice blend for the flavor signature of your choice: 
cinnamon, allspice, mace,
OR
cumin, chili, cayenne, Mexican oregano
OR
salt, pepper, thyme
OR
tomato, garlic, oregano, basil
OR
whatever you love

Pastry for a double crust pie - make it or buy it *my recipe is below*

INSTRUCTIONS WITH PICTURES AND COMMENTARY:

Grab some ground meat, this is a 50/50 combination of beef and pork,  Chop up some vegetables, carrots and onion.  In a large frying pan, saute the onion and carrot until it's tender, add the beef and fry, pretty high, until it's dark brown.
   
I add a little tomato paste and fry that around a bit then add whatever spices strike my fancy that day  If I have any left over veggies, I toss those in as well.  I had peas and potatoes so some went in the mix.  

IF it's too liquid, add a little flour/roux and tighten it up.  IF it's too tight, add a little water or stock.  I think you need more moisture while you cook it but then we strain it so whatever excess cooking juices there are can be used to enhance a fabulous sauce to have with it pie. 

Let it all simmer for about 15 minutes.  Transfer it to a strainer!! and let it wait for the pastry.  You don't want to put hot filling on cold pastry.  Keep the juices in a saucepan to make gravy with, skim some of the fat but leave some for flavor!!
   
Roll out your pastry and transfer it to a sheet pan. This is a half sheet pan.  Pile the cooled filling in a square in the center of the pastry and pat it down pretty densely.  

My vodka pastry is super quick and easy: 

2 cups all purpose flour
1 heaped tsp salt
1 heaped tsp sugar
1 cup fat (butter/margarine/shortening/lard combination)
1/4 cup ice cold vodka
enough cold water to make a soft dough

I put all the dry ingredients in a food processor then add the fats and cut it in to look like small peas.  I toss all the vodka down the tube while it's running then enough ice water in a slow stream until it comes together as a ball on the blades.  Stop the machine immediately.  Remove the ball, divide it into two and wrap and toss in the fridge for about an hour.  Load of people moan at me about my bad method about blending too long or not measuring properly BUT, I make a killer, flaky pie crust so apparently my wrong way works just fine, try it, you'll like it :)

Roll the second half of the pastry and top the square.  Curl the pastry bottom and top together around the edge so your filling doesn't oooooooze everywhere.  

Poke some holes for air in the top and egg wash the whole thing.  Pop it into a hot oven, lowest rack, until it's cooked through, brown, bubbly and looks fabulous, bout 30-45 minutes.
   

While it's cooking, boil the reserved juices from the strained filling down with a thickener, either a roux or a slurry made from flour and water, season to taste.  This is also lovely with an onion gravy or a tomato sauce with it.

AFTER 45 minutes, pull it out and let it sit on the sheet pan for about 15 minutes.  CAREFULLY transfer it to a rack and leave it another 15-30 minutes
   
oh look at this beauty
 
After it's rested, slide it carefully onto a cutting board and cut it into large wedges
  
Serve it with mashed potatoes, pasta, nothing, salad, veggies or just eat it on it's own.  It's a solid go-to meal that you can have on the table any time, any day.  You can make everything ahead and assemble at the last moment or make the whole thing ahead and pop it into the fridge or freezer before you cook it.

Here's the beauty shots:


So, now that you're thinking about what you have in the fridge and what you can do with it...  go make yourself a meat pie :)  you'll be really happy that you did. 

/enjoy