Thursday, March 31, 2011

Boiled Eggs

Good morning, it's boiled eggs 101.

Don't flip away, seriously, I got asked for basic stuff so here we go.

A boiled egg is a beautiful thing when done correction and a dismal disappointment when done wrong.  I am going to share MY egg system and if all goes right, you'll be a happy camper with a beautiful thing on your plate every morning.

I will say, as simple and basic as a boiled egg is, you must have good toast.  I suggest making the old lady bread and the next day making relatively thick toast with it, butter heavily and let it wait for your egg.  It's solid enough not to sog out on your while the egg cooks.  Alternately, make your own toast ;)

Put 1 or 2 eggs in your favorite saucepan, cover them with 1 inch of water and then remove them!  HA!  way to measure the exact perfect amount of water! Put the eggs on the counter beside the stove and turn the water on medium high, until it's a rolling boil.  GENTLY put your eggs (extra large for this version to work right) in the boiling water.  When it returns to the rolling boil (which will be pretty instant) set your timer for 4 minutes.  Leave them to boil and attend to your toast!  When the timer goes off, pull the pan off the heat and let it stop boiling completely.  Remove the eggs.

In order for this to work you also need one more thing, it's mandatory, a ridiculous egg cup.  No, really, it matters.  I like my ridiculous set; I used to have a beautiful plain white set of egg cups but really, why?  Go silly whenever you can!

Ok, butter and slice your toast into soldiers (again, non optional!).  Put your egg in the egg cup fat side up and with a serrated knife, whack it 1/2 inch down then saw quickly through to flip off the lid.

Use a teensie weensie spoon to scoop the white out of the lid, look how beautifully cooked it is!!  The white is set and the yellow is still runny, no stringy bits or mystery raw eggy blobs, nope, it's a lovely thing.

Dunk the toast to sop up the warm runny yellow and the teenie spoon to scoop out the white, also eaten on the toast soldiers.

My contribution to college students everywhere who hate the fact they can't peek into their egg to the desired doneness.

OH and if you have a large egg, do 3 minutes 45 seconds.  Small or medium eggs, well don't even bother because the effort isn't worth the feed :)
  

Let me know how it goes! Enjoy breakfast!!


/enjoy

Wednesday, March 30, 2011

Chicken with 40+2 Cloves of Garlic


Ok, I'm sort of a garlic gal.  I like it when it's cooked long and low and slow, it gets sweet and nutty and has that background flavor of garlic.  I like it raw when it's sharp and spicy.  I like it slivered in a pan gravy when it's slightly browned, crisp and on the edge of bitter.  Yeah, I'm sort of a fan.  When I was in Costco last week they had the gigantic net bags of garlic on for $5.00, there was no way I could have left the store without them. 

Wandering my local grocery shop yesterday I was delighted to see that chicken thighs were on sale AGAIN.  Seriously, do people not know what a sweet deal they are?  They are way cheaper than breasts, better tasting, better suited to cooking of any type, never dry out and, well, I guess there's more for me this way.  The sale netted me a "family pack" of thighs, 10 rather large ones, for $4.00.  Really, there's no way I could have left the store without them. 

I am seriously in love with my large, 6 quart, red, 1,000 lb, cast iron, white enamel lined dutch oven.  I have noticed I look for things to cook in it just so I can use it.

I don't know if it's the moon, the pollen in the air, the tilt of the planet or what but I have a feeling three of my most favorite things are about to come together in a cosmic boom that'll leave me, and whoever is lucky enough to be near me later, licking lips, fingers and toasting the fact it all came together with a few minutes of activity, 2 hours of doing something else while it dealt with itself and a mountain of mashed potatoes that I never mind making!


In the dutch oven, drop a blob of bacon grease and get it smokin' hot.  Salt and pepper the skin side of the thighs liberally!!  and fry them in two batches.  Salt and pepper the top side while you are waiting, do not futz with it!  Leave it good 3-4 minutes.  Check to see if it's brown enough to flip...this is NOT brown enough!
  

Ahhh, THIS is brown enough, flip!  Cook a few minutes then transfer to a bowl, do the other half. We aren't trying to cook the chicken through, merely give a good base to the sauce and get the skin nicely crispy for later when we reheat it without a cover to get it crunchy again.
  

You can see (above) there's loads of fat in the pan, toss most of it, this (below) is how much you want left. Throw in 42! unpeeled cloves of garlic, shush them around a moment then pour in a couple of glugs of chicken stock, just enough to boil madly and pick up all those yummmmmmy brown crunchy crusty chicken flavory bits on the bottom.
  

Boil it for just a minute then glug in a little white wine. Boil it for a moment, and seriously, look at this sauce already!  couldn't you just drink it?  Salt and pepper a little if it needs it.
  

Nestle the chicken thighs pack in the pan in a relatively flat layer, we will be reheating this without the lid and I want as much skin as possible in direct heat to re-crisp it later.  You will see the liquid is barely 1/4 of the way up the chicken.  I don't care if the meat it in liquid.  The beautiful thing about thighs is they are virtually impossible to overcook so this is a great meal to cook in the morning and then leave to reheat when the masses are drooling at the kitchen table.  I have fresh thyme growing in my laundry room (don't ask) so I cut off a few sticks of it and tossed it on the chicken.  Clamp on a tight lid and toss it into a 325 oven for 2 hours.
 

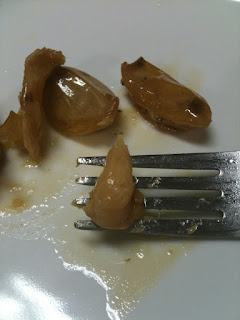
Ahh, here we are 2 hours later, the chicken is ridiculously tender, the sauce is concentrated (you can add stock if you want more sauce after you remove the chicken and boil it down, I'm not going to today).  The skin is softened but a few minutes under a broiler or in a hot oven without a lid will bring it right back, or you can eat it as it. The garlic is so soft you can press down on a clove with your fork and the soft, nutty, garlicky innards ooze out.  I like to spread it on bread but tonight i'll smear it on the chicken as I eat each glorious mouthful!   
  

I fished come garlic cloves out for you, in the name of science and thorough blogging of course and, um, yeah I ate them for you too!  mmm
  
 Oh why not, here's a couple more beauty shots, see you can squash them out whole or keep squashing them and get a delicious blob on the end of your fork and then eat or spread on bread or on the chicken.  Hmm, would my family mind if *I* ate 6 hours before they did?  The smell in here is unbelievable!
 
Oh, ok, I'm busy for the rest of the day so I'm leaving it covered on the stove-top and will heat it up when I come home and make mashed potatoes and I'll steam some sugar snap peas to go with it tonight.  So, sure it took me 2 hours this morning but it'll reheat in the time it takes to make the vegetables and it is so delicious and the garlic is soft and you can squeeze the cloves out to have along side.

Go on, make it with your three favorite things, it's a keeper "recipe", you know you want it! 

/enjoy!

Tuesday, March 29, 2011

Floured Bacon


 My Nana retired to Mesa, Arizona with her best friend, Bertha. Bertha was from somewhere in the South and had some fantastic recipes. My most favorite dessert is Bertha's carrot cake and unfortunately I don't have the recipe anymore. I don't know if it'd ever taste quite so good without her anyway. She was taken many many years ago but I think of her still sometimes.

One of the things Bertha did was microwave bacon. Ok that's not so wacky in the scheme of things but back in the day it was cutting edge! Oh and maybe telling you she floured the bacon first then nuked it on newspaper (which I am absolutely sure enhanced the flavor) makes it odder?

I was pondering my world this morning, feeling quite reflective. I have an idea to try to help me make a few dollars and that made me think of Nana. I also decided that I'm getting a tattoo and I finally decided what it is, it's going to be ivy on my left arm. Nana's name is Ivy. I can't say 'was' even though she's been gone from our eyes for 12 years, only gone from our eyes, she's ever present in our minds, hearts, memories and in my  inspiration.  Anyway I'm waxing way too poetic here, basically, I had a hankering this morning while I thought of Nana and Bertha.  Bacon.  Floured bacon.

There's no bells, whistles or great culinary brilliance here.  Here's my breakfast:

A few pieces of paper from the local Statesman and 3 slices of bacon.  Put the newspaper in the microwave and lightly flour your bacon.  I cut my bacon slices in half so it looks like more!  You can heavily pepper the flour if you are in the mood, I wasn't today.
  

Put the floured bacon on some paper towel (or not) and cover with a double piece of paper towel.  You need the paper towel on the top, you don't need it on the bottom.  It depends on your concern with eating newspaper ink.  I don't have any but I transfered the bacon from the island to the microwave on the paper towel and, frankly, forgot to take it off.  Microwave on high for 3 minutes (in my 1100 watt machine)
  

I like VERY crispy bacon.  3 minutes will give you VERY crispy bacon.  Do it less if you must but don't tell me.  The bacon stays very flat, straight and has a slightly thicker feel without actually being thick cut bacon.  I really like it this way and am glad I had the hankering today.

The bacon is also very dry when it comes out, the flour absorbs fat and so does the paper and paper towels, there's condensation below the paper but no puddles of grease.  When I want bacon grease, I cook the bacon on a rack over a sheet pan in the oven, 425 for 15 minutes and I get crisp bacon and a sheet pan full of  grease that I put in jars and use to cook.  Did I mention I'll never be a size 2? or any single digit?  or hardly any of the lower double digits?  But I digress, this isn't about my ever expanding girth, it's about bacon!   Look at these beauty shots!
 
Luckily, I had a loaf of old lady bread from yesterday that perfectly fit my bacon slices.  YES I did eat most of it before it managed to make it into my sandwich.  I believe we have had this conversation before, I am incapable of NOT munching on cooked bacon.  In any event, look at these lovely ripe tomatoes, I sliced one thin and added it onto the buttered bread and salted and peppered liberally.  Squash them together, cut in half purely for the beauty shot and voila, breakfast in 3 minutes.
 
Oh well yes, it was THAT yummy.  The bacon stays very crisp and very straight and well let me just say, Thank you, Bertha.  x

So, in conclusion, go nuke yourself some bacon but be sure to flour it first! 


/enjoy

Monday, March 28, 2011

Old Lady Bread! (way old school)

I watched a youtube video a while back of an old lady making bread. She made a lot of loaves at one time. I figured I could scale it down and make one loaf at a time. I tried a number of ways, techniques and measurements then it occurred to me; the old lady didn't measure. I need to trust my sense of feel and just do it. I think I succeeded rather brilliantly so I share this with you, such as it is.

I grabbed my giant tin bowl, old lady bread should, realistically, be happier on an old bowl. I dumped in 2 cups of flour (approximately!) 1 mini palmful each of salt, sugar and yeast. I am guessing 1 tsp of each.

I mixed it around with my fingers. I filled an old jam jar (purely for the old lady bread affect, I could have used a measuring cup but really, what fun would THAT have been?) with warm water from the tap and started pouring it in until it came together as a really shaggy dough. I turned it onto my board and kneaded about 3 minutes dusting LIGHTLY with flour if it tried to stick. I made it a pretty soft dough, just at the edge of sticking.

I covered it with a damp cloth and left it on the counter, it doubled in about 70 minutes. I didn't punch it down, I gently coaxed it out of the bowl and rolled it back and forth GENTLY until it looked like a log, I cut a couple of slits and lifted it into a vessel in which to cook it. I've done it on a sheetpan (long wide loaf) in an 8x8 square pan (weird shape but yummy) and in a regular loaf pan (slightly taller, more bread v crust ratio). Pick your vessel! I left it to rise, covered about 45 minutes then into a 350 oven until it was "rosy". 40-45 minutes maybe? Remember old ladies not only don't measure, they don't time.

It's a hearty, rustic loaf that takes nothing to make if you're home anyway and you can have it sliced thick with butter and cheese (and a lovely Chilean Merlot) for lunch when your day has gone to hell in a handbasket anyway.

I just gave you the recipe, this is one of those "all pics and no substance" posts. Here's the play by play shots: *remember, make it and let me know how it went!!!!!!!!!!!

Ok, tip it in the bowl:


Mix it around and start adding some of the warm water from the jam jar!

I sort of use my fingers like a whisk and add the water down my palm and sweep around from the outside of the bowl in then squish it. It becomes a shaggy dough then a couple of squishes later, it clears the side of the bowl and almost looks like dough!

I knead it a couple of times in the bowl then transfer it to the board and knead with a very light dusting of flour until it looks lovely, about 3-5 minutes?

It's still sort of a blob but only a few more minutes and it'll be dough! These are only a few minutes of kneading apart, the second ball is much smoother and softer. Plunk it back in the bowl, I don't worry about greasing or buttering, this is old school bread, remember?

Ok, my favorite Ikea .49 tea towel is dampened and put over the bowl. I think I'll go do a load of laundry while it rises.

I don't punch it down, I sort of release it from the bottom and roll it out of the bowl. I rolled it back and forth a few times until it looked like a loaf and was long enough to go corner to corner on my sheet pan.

This is the long loaf on a 1/4 sheetpan, lightly sprayed because everything sticks to it *as is evident by the ghost cookie outlines! Throw a towel over it and leave it about 45, until it WHOA did it EVER double!

This loaf (above) was very wide and very short, good for angle slicing, toasting and smothering in fresh tomatoes, basil and olive oil.

This loaf (below) is more traditional and good for, um, everything else.

Today's loaf (below) in the loaf pan I hate but it came out beautifully.


Cut thickly, slathered with butter and some good, sharp, English Cheddar. Sure, this may be why I'll never be a size 2 (or 12) but hey, I am happy at lunchtime on a really crappy day. :)


Grab an old tin bowl and a few ingredients, work with your hands and don't measure. You'll be delighted at lunchtime with your creation, it means more doing it this way somehow.

/enjoy!