Monday, March 18, 2013

Pressure cooker steamed pudding


YES WAY! 

So, I love steamed pudding from back in the day from across the pond. My British family are steamed pudding machines and can whip one up, steam it for 4-5 hours and produce the most delicious, lovely, unctuous, tender, soft, rich, flavorful pudding you'll ever eat.

I did futz my way to a great recipe which is on the blog here: http://www.tracycooksinaustin.com/2010/12/steamed-syrup-pudding-oh-yes-baby.html

My international tester (it's my mom!) was playing with the steamed syrup pudding and had the brainstorm to pressure cook it. NOT only to pressure cook it but then to freeze it both before and after it was cooked. Guess what? BRILLIANT! We are always trying to figure out what we'll test next in the pressure cooker and she hit the jackpot with this one.

The recipe works perfectly in the pressure cooker, in individual jars (I have to have my jar fix) and you can cook it fresh, prepare the batter then freeze it in the jars and cook it from FROZEN, you can prepare the batter, freeze the whole batch, then defrost and divide and then cook it. Seriously, she's one hell of a thorough tester.

Here's the recipe again:
In a bowl, cream
120 g sugar (4 oz)
120 g butter (4 oz)
ADD
2 beaten eggs
120 g a/p flour (4 oz)
1/2 tsp salt
1 tsp baking powder
drop/s of vanilla
golden syrup or jam or marmalade or fruit

Cream the sugar and butter, add the rest of the ingredients and beat until it's a thick, smooth, batter. I never bother with the Kitchen Aid, I just use beaters. 

Butter 5 mini jars or ramekins and put a tablespoon of your favorite gooey treat... jam, marmalade  golden syrup, maple syrup, pie filling.... whatever you think of you'd love warm and on top of a steamed pudding. 

Divide the batter between 5 mini jars (or ramekins), put lids on (or cover with plastic wrap) and freeze.

When you are ready to use them, remove the lids and cover loosely with greased foil. Place then in a pressure cooker over 4 1/2 cups of water, set the STEAM timer for 35 minutes. When the timer goes off, release immediately, remove from steamer, turn into a vessel for eating and EAT IT!!
Here is the long winded, picture heavy, play by play: 
Cream the butter and sugar, then add the rest of the ingredients.  I love my beaters ;)
  
Here are my 5 little jars, all buttered.  In two of them, I put raspberry jam, about a tablespoon.  In two of them, I poured the nectar of the Gods, Golden Syrup and one I left plain... all for science.
 
Beat the batter until it's smooth and creamy and very thick!
   
 
Spoon the mixture into the jars, over the filling which will be the topping!

  
Put the lids on, put them into a circle to take their picture then pop them into the freezer!
  
Take the frozen puddings out of the freezer and remove the lids.  Solid as a rock!  Make very tall tinfoil hats for them and seal around the side of the jar, we're just trying to stop water from getting in/on top.
   
Awww... little foil hats.  Now then, put them on a rack in your pressure cooker over at least 4 1/2 cups of water.  
  
LOCK AND LOAD!  Set the rocker to VENT and the STEAM timer for 35 minutes. 
 
DING!  *I'm dying to see how these worked!!
  
TA DA!  LOOK!!  Look at them! HAHAHA  They rose like CRAZY!
  
I grabbed the jam one first... Run a thin knife around the edge and tip into a beautiful vessel...OOOOOOOH!!!   
It looks stodgy but it's NOT!  It's light and delicious and warm and tender and absolutely perfect.  Yeah, I ate it.
 
Golden Syrup time!!!!! OH MY GOD
  
LOOK how perfectly this came out!!  Just as light, just as tender, as delicious, as easy.
 

WELL, well, well. 

I think we've learned something here.  There's no reason on earth NOT to eat a steamed pudding every.single.day.  Make a batch in jars and shove them in the freezer, bring one, two, three out when you want and steam them in half an hour and you have the perfect dessert/treat without having to steam it for 4-6 hours.  Seriously. 

OH and Tester advises that you can make the batter and freeze the whole batch in a bag, thaw it in the fridge and then steam it in the pressure cooker in individual servings the same way and it comes out just as perfectly.  *we skype cooked today so I saw how well hers rose too. 

Go and get some jars and make yourself a steamed syrup pudding. 

/enjoy

Sunday, March 17, 2013

Some thoughts about me, my food and my Blog Posts

English Farnhouse Loaf
Tallest one yet!
*recipe is on blog

I'm going to have a chat with you all for a moment, if that's alright.  Get a glass of wine or a coffee and ride along with me. 

One of the delightful things about my own blog is that no only am I lucky enough to share help or thoughts and suggestions about something in which we obviously have a shared interest but it's also where I can share my thoughts about other things that are related to the straight up recipes and tips and tricks I share. 

More people come to the blog to visit and I find my recipes and blog address on many sites which is so very exciting!  The down side is that there are people who send me challenging notes and comments about what I do here.  To be clear, I do this for fun, you come here for fun, let's just play nice.

I have had some questions put to me lately that I think require some shared thought.  These are not all from one source.

I was recently asked to link a recipe to another site, the owner of the site claimed to have "invented" the process I used.  

Well, come on now.  There are really no new ideas or recipes.  We all just take what we have and work it in a way that makes us happy and supplies us with good tasting food.  We have all been cooking in vessels of every description since the invention of the cooking vessel.  I don't steal ideas, I don't steal recipes or methods.  I research sometimes and I use my old, antique, cookbooks that are piled up on my kitchen table.  I get a large glass of wine and comb over them like well known, well loved novels.  I rarely put one down without a dreamy moment envisioning the 1865 housewife holding the same book.  I wonder, will a mom, in 2155 read my blog posts?  or hold these books?  It boggles the mind.  Well, it boggles mine.  Look at me digressing...  ANYway, I post on my blog what I do and how I do it.  These bread recipes are all mine, I test them constantly and tweak them all the time.  I tell you when I use a recipe I found in an old book, I tell you how I changed it and I give credit to the original writer.  I don't use or read current recipes.  Ever.  If I see something interesting somewhere that I think you'd like to know about, I'll tell you where I saw it.  Honestly, I don't have the energy to thieve.

I was asked if I use professional cookware or professional kitchens or appliances and why I would dare suggest purchasing equipment at a restaurant supply store

Firstly, I most certainly do not have professional equipment or cookware. I wish I could, don't we all wish we could. 

I use what I can find in my local low brow stores. I shop at thrift shops, the sale aisle in my grocery store, at standard big box stores like Walmart (where I got the Nesco pressure cooker on sale for $65) or my delightful discovery of the restaurant supply stores.

I think everyone should be told about all of the options.  I found roasting pans at my restaurant supply store that were 1/3 the price of lower quality (but prettier) pans at Williams Sonoma, Sur La Table or Bed Bath and Beyond.  I love all these stores and shop at them frequently but if I can find an alternative that will save me a bunch of money then I will absolutely, positively, share that information with you.  You can decide where to spend your hard earned dollar.
I look for ways for the home cook to achieve exquisite, delicious, results. I cook old fashioned food. I cook from scratch. I look for inexpensive options, always. 

I shared the information on the blog about utilizing restaurant supply stores that are open in most major markets and most have online ordering. Many people think those stores are only for the professional or only sell high ticket items. I wanted to share my discovery to the contrary. I find the supply stores sell high quality, low cost, items. The staff is generally knowledgeable, helpful and know about food and about cooking and that is exactly the expertise I'm looking for. It's all they do. That's a bonus.

Specifically, most recently, I had been looking at extra large loaf pans because I wanted tall straight sided loaves instead of "mushroom" loaves. I found some pans online, in other countries, but found them cost prohibitive. I went into the supply store to look to see if they had any of the size I wanted. They didn't. While I was there, I spied a stainless steal steam pan in the exact dimensions, for $6 and snapped it up. I experimented, found it was completely and totally successful and then shared that information with my audience. 

I feel my job is to experiment with recipes and with alternatives to overpriced brand name equipment (pampered chef pan was $24 and even Walmart wanted $11). I try to share what I find with those who are interested.

There are so many options out there, I'm glad I could pass along one that will save some money and give extraordinary results.

I was asked is who do I think my audience is.  

I think my audience is people who love food.  People who cook.  People who eat food.  People who wonder about food.  People with a question, a suggestion or a thought about food.  I think my audience is everyone. 

I hope my audience finds my suggestions, recipes and processes helpful, useful and interesting.  I hope sometimes they giggle, roll their eyes or giving a knowing nod when I wax poetic about adding just a little extra butter or bacon fat. I hope they smile, take notes, carry me into the kitchens on their laptops, tablets or phone.  

I'll tell you, one of the delights of my day is when I sit down with my coffee in the morning and look at my statistics on the blog.  I grin and often giggle when I see I've been visited from locations around the world.  I see visits from a country on a regular basis and I imagine it's a friend from far away who pops in regularly just to see what I've been up to.  No google search, no specific question, just someone who came across my little food blog spot and decided to remember to come back.  Sheer and utter delight. 

More often than not, I decide which culinary adventure to take based on what posts have had the most hits in any given day or week.  For example, pressure cooker meatballs is the current big winner on the blog.  That makes me want to improve it, cut the time, increase the flavor or just streamline it for you.  

Finally, I was asked, what makes you a so called expert in anything and why should anyone listen to you?" 

Well, I'm no expert.  I'm a gal who loves to cook.  I come from a line of cooks, mom cooks, who loved what they did.  I watched my mom and grandmother cook.  I have told friends before, it's not that I CAN cook, it is that I DO cook.  Everyone CAN cook, it's not rocket science, the question comes into whether or not they DO cook.  Some people have other interests, obligations, time constraints or just find it dull and pedantic.  I've never claimed I CAN cook any better or worse than anyone else.  I simply DO cook and I enjoy it. 

I have a deep passion and it brings me joy to do it.  I cook when I'm sad to make me feel better.  I cook when I think I'm not good enough, because it makes me feel better.  I cook when I'm joyful and celebrating.  I cook for groups, friends, family, for myself.  When I am alone for a meal (it's so rare but I love it) I cook a 3 or 4 course mini meal just for me.

When I cook, I like the process, the experience, the science and the end result.  I don't claim to be anything other than someone who loves what I do every day regarding food and decided to write it down and share. 

I don't get paid to push a product or company.  I don't get perks for reviews of anything.  I just take some time out of my day to share what I think is interesting, helpful and fun. 

I simply hope you enjoy the blog.  I hope you can use the information, tidbits and you decide to make whatever it is I've shared with you when perhaps, before, you'd been afraid to do it.  I hope you have a little smile when you read my "LOOK! LOOK at what we DID! Can you BELIEVE it?!" that I tend to share in my posts because when I write that, I mean that, I said that.  I'm genuinely tickled with the results and I write as I said it to you, here in my kitchen with me, peeking into the oven, under the pot lid or opening the proofing box. 

I'm going to keep doing what I do.  I love it and so far, you all seem to be totally supportive so, let's see what we do next.

Ok, that's my little sharing moment done.  I'm working on the final details of a pressure cooked, individual serving, steamed pudding with golden syrup on the bottom.  Oh yeah, baby, it's crazy good.  My international tester played with my original recipe and I'm testing it now.  I see a juicy, mouthwatering blog post about it in the very near future (tomorrow) so come back with an appetite and sweet tooth. 

Thanks so much for playing with me today. 

/Tracy


Friday, March 15, 2013

Risotto , my way

QUICKIE DINNER TIME

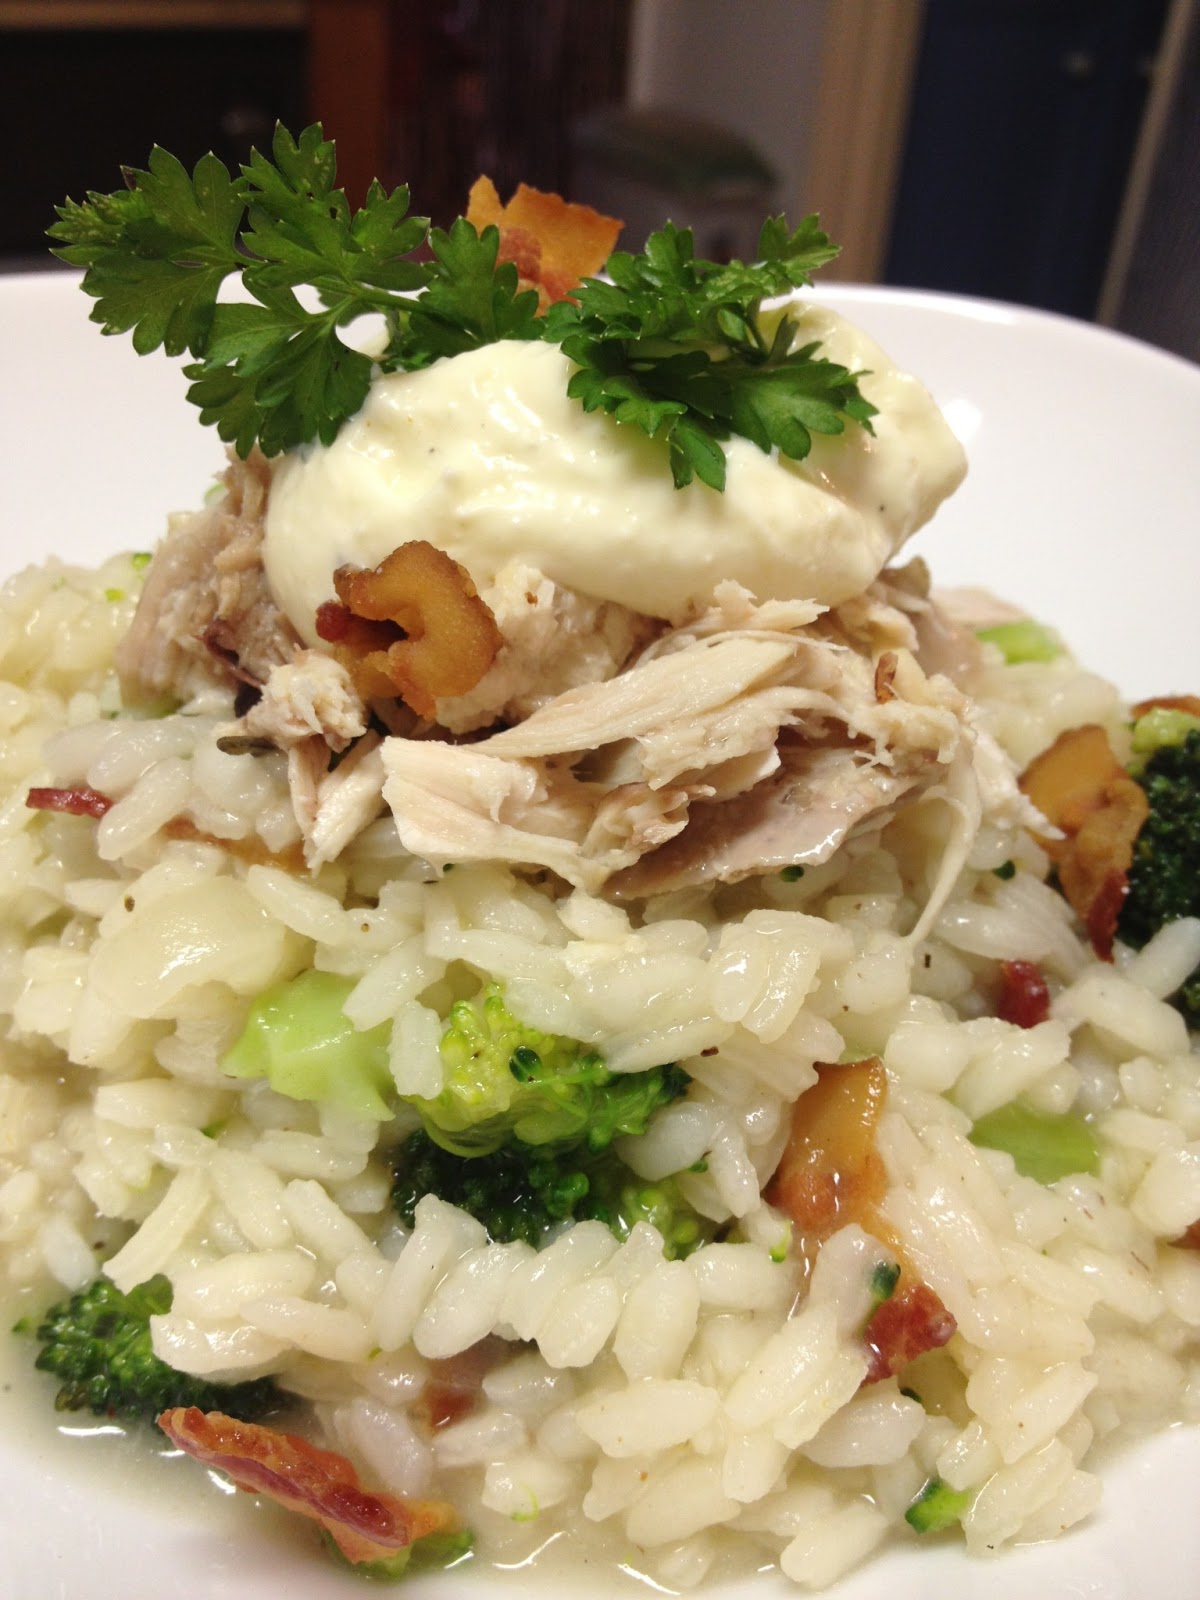
I didn't want to cook tonight, it's Friday, I'm tired.  I had arborio rice in the pantry and some bacon, some cooked (pressure cooked) broccoli and some leftover poached chicken.  BINGO! 

Risotto is a method, not a recipe. I use the equation, however much rice you use (I had 2 cups so I used 2 cups) be sure you have 4 times the amount of hot stock (I poached a chicken in the pressure cooker yesterday and had that stock)

Fry some bacon, I used half a 12 oz packet.  Save the crispy bacon aside and drain about half the fat.  Fry half an onion in the bacon fat until soft but not colored.  Add the rice and fry it around for a minute or so then add a glass of white wine.  

Cook the wine into the rice then start adding hot stock, 2 ladles at a time and cook over medium high heat, stirring, until the rice absorbs the liquid.  I like to stand at the pot, with a very large glass of wine, listening to music or watching the news while I stir gently, this isn't hard work. 

Keep going until the rice is tender, about 15 minutes?  When you're happy with the rice, add one more ladle of stock, a large knob of butter, the cooked broccoli and crispy bacon and stir around.  

Pile it onto a plate, add some poached chicken, shredded, on top and a large dollop of the homemade aioli I'll tell you how to make another time on top of that.  Put a little parsley on top to chef it up and serve.


If you don't have arborio rice in your pantry all the time, shame on you.  You can always make a variation of risotto for dinner with anything you have left over.  I keep stock in my freezer all the time and in a pinch, you CAN cut it half with water so there's no excuse whatsoever for not making this, often.  
*purists insist I should have mounds of freshly grated Parmesan cheese on top but I didn't have any and was not going to let THAT stop me from making this for a rich, delicious, creamy, crispy, filling, joy giving dinner*

/make risotto


Thursday, March 14, 2013

NEW Single White Loaf , Farmhouse style

Recipe below, play by play pictures coming... in the mean time, look at what came out of my oven:


To get an idea of the scale...


Oh and I didn't make it in a loaf pan! I made it in a restaurant steamer pan!!!!! OH YES I DID! I couldn't get a pan with the dimensions I wanted in the USA, the shipping for a "Farmhouse" loaf pan from the UK was going to be twice the cost of the pan and that just bugged me. SO, when I was at the restaurant supply store moaning about their lack of high sided loaf pans, I had a total epiphany!!

HEY, I said, I LOVE LOVE the steamer pans for roasting vegetables and chickens I bought there. It cooks perfectly evenly, is stainless steel and nothing, absolutely nothing, sticks to it. I thought, HEY, why not see if they have a size that I could use for white bread and they DID!

It's a 1/4 size I think, it's 4 inches deep(!) and 8 inches long and about 4 inches wide. EXACTLY what I wanted. I'm going back to buy more so I no longer have to play wait for the pan I love the best and can retire the old rusted nasty pan I usually make my loaves in. This is...perfection.


OK, here's the recipe, it's so very easy and so much more delicious than any white bread I've ever made before. I have tested this many times and had testers try it... it's a good one ;)

TRACY'S ENGLISH STYLE FARMHOUSE WHITE LOAF

*You CAN make this by hand, I use the Kitchen aid, just use a spoon until it's too hard to work then knead until a smooth dough, no Kitchen aid is no excuse not to make this!*

4 cups (450 grams) all purpose flour

2 Tablespoons cold butter *unsalted
2 tsp yeast
2 tsp salt
2 tsp sugar
300 ml room temperature liquid *I do 200 ml warm water + 100 ml 2% milk

METHOD:

IN the bowl of a Kitchen aid with a dough hook, combine the flour and butter.  RUB the butter into the flour like you are making biscuits or pastry. You don't want any chunks of butter, this must be totally combined. 

ADD the yeast, salt, sugar and MIX around with your hands.

ADD liquid all at once.


COMBINE on slow speed until combined, it should completely clear the sides of the bowl. Then turn on high and knead for 4 minutes to make the dough a smooth, soft, dough.

Butter the dough lightly and put in a box/bowl with a lid (or a bowl with cling film) and leave to double. *mine takes 45 minutes.

Gently transfer dough to a lightly floured board and flatten with fingertips. Roll into a loaf shape and put into a lightly buttered/sprayed pan. Leave to double. *mine takes about 45 minutes.

Bake at 450, 
for 30 minutes.  I turn it a couple of times during cooking.  I don't spray the oven, loaf or put ice in with this bread.  If it's getting too brown, put a piece of tinfoil over the loaf. 


Leave to cool on a rack, removed from the pan, until completely cool before you slice this. It's soft and sweet and the crust is just hard enough to hold it but soft enough to yield. Yeah, you're going to LOVE this, I want to see pictures of your bread!! 

Let me know how much you love this bread.


**I like a TALL loaf and have been using a steam table insert pan, stainless steel, that measures 8x4x4 inches. Previous to my ephiphany, I used a standard loaf pan. This also makes ridiculously good little rolls**

Alrighty now, go make it.

/tracy


Monday, March 11, 2013

Crusty, Rustic, Italian Bread

Confession: My name is Tracy and I'm a breadaholic, a serial bread baker, and yeah, I like it.


I've been trying to nail rustic Italian style bread with a thick, crunchy, crust that stays crunchy until you wrap it. You'd think that would be easy. It's not. I make bread. I make a lot of bread. I make it every day. I tried other people's recipes, some worked, some didn't. None were what I wanted, none had the flavor, texture AND the crust all at the same time.
Until now; look what I mastered!!


I've done it. I'm going to share it with you. in return, you have to send me pictures of your bread, your videos of the moment of discovery, the slicing the crust.  

I want to see what you do with what I'm about to give you ;) I'm absolutely delighted that I made this work. I made it work repeatedly and I made it work in other people's kitchens. It will work for you. Make this. Seriously. 

I'm not breaking this into two recipe forms (quick and long winded) like the other posts.  It's long winded, heavily picture supported the whole way.  Bread isn't a recipe, the method, the look, the feel, is always part of it, probably the most important part.  Here is how *I* do what I do.

I'm a master ciabatta maker.  I'm a bit of a one trick pony where it's concerned and am asked to take it everywhere I go.  I happily oblige.  It's nice to be famous for something.  I was making it one day and wondered what would happen if I kept the recipe pretty close but merely changed the METHOD... would THAT give me what I wanted in a hard, crunchy crust loaf? I also went old school and figured they've been making this stuff in the old country since year dot without electric appliances so I gave it a go and did it all by hand, THIS is what happened.

Tracy's (version) Crusty Rustic Italian Bread

580 grams a/p flour (4 cups but I wanted to weigh it to be sure and to help with consistency)
2 tsp yeast

2 tsp salt (I use kosher sea salt)
3 tsp sugar

2 cups warm water

Combine the dry ingredients in a proofing bucket.  Ok if you don't have a proofing bucket, use any old bowl you have, just be sure it's really big, you want it to have room to rise.  

Mix the dry stuff around with a really old wooden spoon :)  then add the water all at once.
   
Mix it around, it's a thick, unruly, gloppy (technical term) mass.  Be sure you get all the dry stuff from the corners, if you're using a square vessel.  I just HAVE to stick my hands in it, I mixed it a little bit (this is COMPLETELY unnecessary but it makes me feel involved and useful).
  
 Pop the lid on it, take it's picture and leave it to rise until it's tripled (the same as the ciabatta)  It takes about 60+ minutes at my house but remember, I make bread EVERY day so I have the "bakery air" thing going on, things rise very VERY fast for me.  I had a tester do this for me and it took closer to 2 hours to triple.  It's fine, just leave it on the counter or on top of the fridge, or in the oven with the light on (I am horrifyingly short of counter space so I put it in the oven to do what it needs to do.  Timer set for 60 minutes.  I'll take us to check then.
 
OK, after an hour, this is what it looks like, I'd call that tripled:
 
I have a french linen bread cloth, tres fancy!  You do NOT need a linen bread cloth from anywhere.  I made this bread on a board just fine, on a tea towel with some flour on it just fine.  I treated myself recently to the cloth as part of my birthday present gift card money.  Although super cool and handy, I wouldn't buy myself one from the grocery money, ya know?

Flour your fingertips and tip the dough (goo) onto the board/cloth/table.  Sprinkle a little flour on it and flip it a time or two to make a ball, we aren't kneading here, just flipping it over, try to keep whatever air there is in the dough.  Be gentle.
     
I cut the dough in half to get two smaller loaves. Press the half flat to an oval about 16 inches long with your  fingertips
  
Fold the top third down and the bottom third just up over the seam and pinch
 
I let them rise a bit seam side up on the cloth, covered, while the oven preheats to 475.  About 15 minutes.
 
I cook the loaves together, on a stone.  I tend to break oven stones, frequently, so I am often without one.  If you don't have one, put a cookie sheet in the oven upside down and bake them on that.  You can transfer the loaves on parchment paper and cook them a bit before you remove it, slide the dough onto the stone with a peel or another cookie sheet.

Bake for 45 minutes! REALLY! IF you are having a nervous breakdown about leaving them in the oven so long, so hot, you can go in and futz with them, turn them, spin them or flip them upside down (i do that about 30 minutes in) to help keep the air bubble/hole structure more even. I don't know if it makes that much of a difference, but I do like to feel involved. 
  
Flip, gently, onto the peel.  I guess the proper term is 'roll' the dough onto the peel (or parchment).  Use your favorite serrated knife and slice a pattern.  I went slash on one loaf and x's on the other
  
Slip them into the screaming hot oven and set the timer for 30 (we're going to check them at 30)


At 30 minutes, this is how they look!  I flip them over and cook for another 15 minutes
 
Oooooooooooh, look!! I flipped again for 5 more.
Onto a cooling rack... and we wait...  
   
Cool about 30 minutes before you slice into this. LISTEN to that crust! 
I made a youtube video of the slicing into it on my tracycooksinaustin channel; here is the link:

http://www.youtube.com/watch?v=RBkCdofMD6I&list=HL1363028746&feature=mh_lolz

Here are some random beauty shots.  It's absolutely delicious.  Hard crusty outside and soft, slightly pully (yeah, that's a culinary term) inside with a fabulous flavor and texture.
  
mmmmm
   
Not bad for a little flour, water, yeast, sugar and salt and a bit of waiting time.  I like to dunk this in ANYthing, it's great for sopping up soups and stews or sliced thin and toasted with garlic rubbed on it... killer!

Go make this...  seriously...

It will stay hard/crusty until you wrap it. I wrap my bread in foil and keep it on the counter. It reheats BEAUTIFULLY and comes back very hard and crusty.

I never keep bread longer than 2 days. If I have some left, I make bread crumbs with it and keep it in Ziploc bags in the freezer or make croutons with it, and then freeze or just toss it to my chickens who absolutely love the stuff.

Ok, your turn, go make this bread and let me know how it turns out for you!! 

YAY for Kitchen Alchemy!!

/enjoy